
A cPanel full account backup is a comprehensive backup of all the files, databases, email accounts, configurations, and settings associated with a specific cPanel hosting account. It captures the entire state of the account at the time the backup is created, allowing for a complete restoration of the account in case of data loss, server failure, or any other unforeseen event.
This type of backup is particularly useful when migrating to a new hosting provider, performing major updates or changes to your website, or simply as a precautionary measure to safeguard against potential data loss.
Table of Contents
cPanel backup includes
A cPanel full account backup typically includes:
- Website Files: This includes all the files and directories that make up your website, such as HTML, PHP, CSS, JavaScript files, images, videos, etc.
- Databases: Any databases associated with your website, such as MySQL or PostgreSQL databases, are also included in the backup. This ensures that all your website content and data are preserved.
- Email Accounts: The backup includes all email accounts configured under the cPanel account, along with their emails, settings, and configurations.
- Configuration Settings: Various configuration settings specific to your cPanel account, such as DNS settings, FTP accounts, SSL certificates, and more, are included in the backup.
- Cron Jobs: Any scheduled tasks or cron jobs configured within the cPanel account are also backed up.
By taking a full account backup in cPanel, you ensure that you have a complete snapshot of your website and associated services, allowing you to quickly restore your account to its previous state in case of any unexpected issues.
How to take cPanel full account backup
To take a full account backup in cPanel, follow these steps:
Login to cPanel: Access your cPanel account using your credentials.
Navigate to Backup : Once logged in, locate and click on the “Backup” icon. It is usually found under the “Files” section.

Choose Backup Option: In the Backup, you’ll find two options: “Backup” and “Restore”. Click on the “Backup” option to proceed.
Select Full Backup: In the Backup section, you will be given the choice between a full or partial backup. Select the “Full Backup” option.

Backup Destination: Choose where you want to store your backup. You can either store it on the server (Home Directory), or you can have it emailed to you or saved to a remote FTP server. Choose the appropriate option based on your preference.
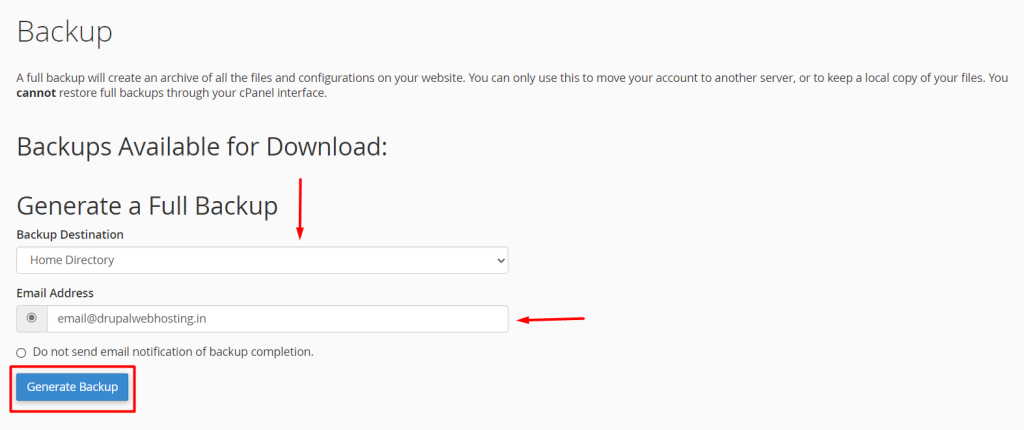
Enter Email Address (Optional): If you choose to have the backup emailed to you, enter your email address.
Start Backup: Click on the “Generate Backup” or “Generate Full Backup” button to initiate the backup process.
Wait for Backup to Complete: The backup process may take some time depending on the size of your account. You’ll see a progress bar indicating the status of the backup.

Download Backup (If Stored Locally): If you’ve chosen to store the backup on the server, you can download it later from the specified location. If you’ve chosen to email the backup, check your email inbox for the backup file.

Verify Backup: Once the backup process completes, it’s advisable to verify the backup file to ensure it was created successfully and is not corrupted.
That’s it! You’ve successfully taken a full account backup in cPanel. Make sure to store your backup file securely in case you need to restore your website or account in the future.


