A 503 Service Unavailable error in WordPress indicates that the server is temporarily unable to handle the request due to maintenance, overloading, or other server-related issues.
This error can be frustrating for both website owners and visitors.
When encountering a 503 error with your web hosting, here are steps and considerations to help you troubleshoot and resolve the issue.
Table of Contents
Method 1: Check Server Status
Before making any changes, it’s essential to ensure that the issue is not on the server’s end.
- Contact Your Hosting Provider: Reach out to your hosting provider to check if there are any ongoing server maintenance or issues that could be causing the 503 error.
Method 2: Increase PHP Memory Limit
A common reason for the 503 error in WordPress is insufficient PHP memory limit. You can increase the PHP memory limit to see if it resolves the issue.
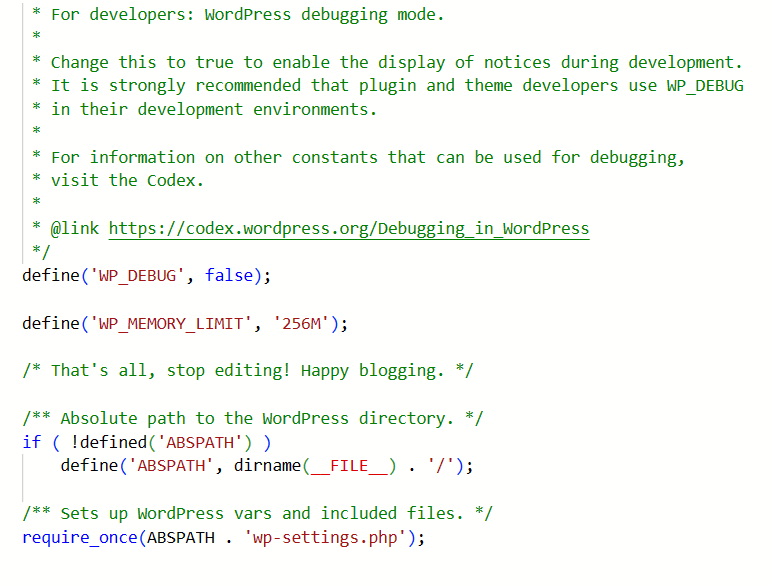
- Edit wp-config.php File:
- Connect to your website using FTP or cPanel File Manager.
- Locate the
wp-config.phpfile in your WordPress root directory. - Add the following line of code before the
/* That's all, stop editing! Happy publishing. */line:
define('WP_MEMORY_LIMIT', '256M');Method 3: Deactivate Plugins
A faulty plugin can also cause the 503 error. You can deactivate all plugins to check if a plugin is causing the issue.
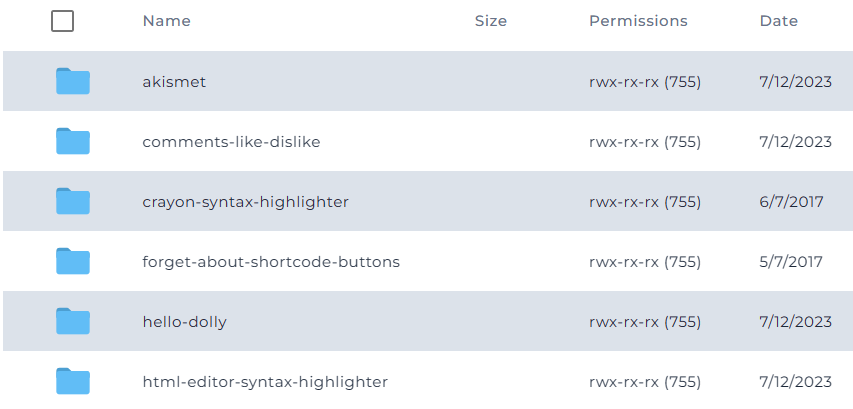
- Deactivate All Plugins:
- Connect to your website using FTP or cPanel File Manager.
- Navigate to the
wp-contentdirectory. - Rename the
pluginsfolder toplugins_old. - Create a new empty folder and name it
plugins.
- Check Your Website:
- Visit your website to see if the 503 error is resolved.
- Activate Plugins One by One:
- Go back to the
pluginsdirectory. - Move each plugin from
plugins_oldtopluginsone by one. - After activating each plugin, check your website to identify which plugin is causing the 503 error.
- Go back to the
Method 4: Switch to a Default WordPress Theme
A faulty theme can also cause the 503 error. You can switch to a default WordPress theme to check if the theme is causing the issue.
- Switch to a Default WordPress Theme:
- Connect to your website using FTP or cPanel File Manager.
- Navigate to the
wp-content/themesdirectory. - Rename your current theme’s folder to
your-theme-name_old. - WordPress will automatically switch to a default theme.
- Check Your Website:
- Visit your website to see if the 503 error is resolved.
- Switch Back to Your Original Theme:
- If the issue is resolved, switch back to your original theme by renaming the default theme’s folder back to its original name.
Method 5: Check .htaccess File
A corrupted .htaccess file can also cause the 503 error. You can regenerate the .htaccess file to fix the issue.
- Regenerate .htaccess File:
- Connect to your website using FTP or cPanel File Manager.
- Locate the
.htaccessfile in your WordPress root directory. - Rename the
.htaccessfile to.htaccess_old. - In your WordPress admin dashboard, go to Settings > Permalinks and click Save Changes to regenerate the
.htaccessfile.
Method 6: Check Server Logs (503 error)
You can check the server logs to identify the exact cause of the 503 error.
- Check Error Logs:
- Contact your hosting provider to access the server error logs.
- Check the logs for any specific error messages or issues that could be causing the 503 error.
Conclusion
The 503 Service Unavailable error in WordPress can be caused by various factors, including server issues, insufficient PHP memory limit, faulty plugins, themes, or a corrupted .htaccess file.
By following the steps outlined above, you can identify and resolve the underlying issue causing the 503 error and restore your website to normal operation.
If you are unable to resolve the issue using the methods above, it is advisable to contact your hosting provider or seek assistance from a professional WordPress developer to help you diagnose and fix the problem.


